I spent several frustrating hours this weekend trying to recover from a nasty virus that has hit WordPress installations on Network Solutions and Go Daddy, which is my hosting service. After wasting many hours fiddling with wp-config files and backing up and restoring databases, I hit upon a simple solution this morning that appears to have restored my three blogs to their former glory. Maybe it will help you.
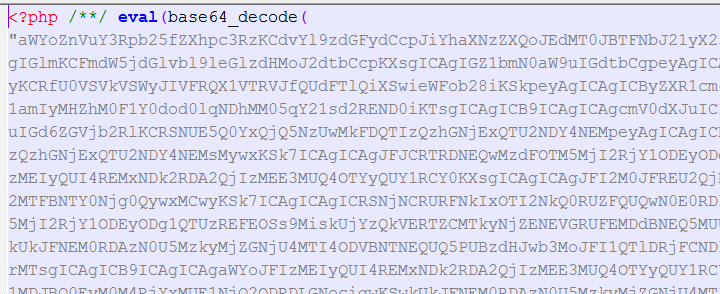
This virus is characterized by the insertion of a long string of seemingly random characters at the beginning of PHP files like the one depicted below. These files are scattered all over your WordPress directories and there’s no telling how many have been infected. You need to remove the malicious code from every PHP file to restore your system, and there could be hundreds of files.
First, the disclaimers: I’m not a programmer and I can’t guarantee that this solution will eradicate the virus once and for all. It’s possible that the creeps who developed it have hidden code somewhere to resurrect it at a later point, so I will post an update few days from now. Also, you should back up your database before attempting any recovery. It’s probably also a good idea to back up the infected files to a safe directory on your computer in case something goes wrong.
That said, here goes. This fix is for Windows, but the Mac version should be pretty similar:
1. You’ll need to download and install two open-source programs –Filezilla and Notepad++ – before you get started.
2. Open Filezilla and connect to the FTP server where your WordPress installation is located.
3. Now you’re going to create a filter in FileZilla to download and upload only PHP files. This will save you a lot of time because you won’t be sending large image and audio files back and forth. Go to “View –> Filename filters..” and choose “Edit filter rules…” Create a new rule called “PHP” or whatever you want. In the “Filter conditions:” drop-down menu, select “Filter out items matching none of the following.” In the space below that, choose the drop-down menus “Filename” “contains” and type “php” into the box. See screen grab below.
4. Then – and this is important – uncheck the box that says “Filter applies to: Directories.” If you don’t uncheck this box, FileZilla will only download files in the root folder and miss all the sub-folders. Click OK.
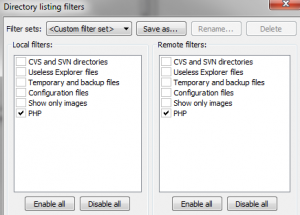
5. Back in the “Directory listing filters” dialog box, check the boxes next to your new PHP filter name in both the “Local filters” and “Remote filters” columns. Click OK. Your file transfer filter is ready.

6. In the “Local site:” window on FileZilla, create an empty directory on your computer where you can store the PHP files you download. In the “Remote site:” window, navigate to the directory containing your blog. This will be the one with the folders called wp-admin, wp-content and wp-includes. You actually won’t see those folders at the moment because your filter is on. If you want to check, temporarily disable the PHP filter to be sure you’re in the right directory.
7. In the “Remote site:” window, select all files (CTRL-A), right-click and choose “Download.” The PHP files will start downloading into the new directory you created, preserving the file structure of the server. This should be pretty fast, because you’re only downloading text files.
8. Once the download is complete, open an Explorer window and navigate to the directory on your computer where the PHP files are located. Right click and choose “Open with…” and then navigate to the Notepad++ directory and choose the file called “notepad++”. Select this as the default for opening all PHP files.
Notepad++will open with all the files you’ve selected in separate windows. Flip through the windows until you find one containing the rogue code at the top.
9. Select all the characters between the first two occurrences of the “<?php” characters. Include trailing spaces.
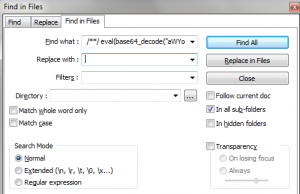
In Notepad++, choose “Search –> Find in files…” The dialog box that pops up will look like the one below. The text you selected should already be inserted into the “Find what :” field. Delete anything in the “Replace with :” field. Then choose the navigation button to the right of the “Directory :” field and navigate to the folder containing your PHP files. Click OK. The program will respond with the challenge of “Are you sure you want to replace all occurrances [sic] of…” Click OK. Notepad++ will churn away for a few seconds and then show you how many files it has changed. The number may astound you.
10. If all has gone well, you should still see part of the rogue code in the window in front of you. This is because Notepad++’s “Find what :” field can’t hold all the characters you need to replace. So you’re going to have to run another find and replace. Simply select the remaining bad code and repeat the previous step to find and replace all incidents in the files. If all has gone well now, the file in front of you should be clear of all bad code. Save that file and any files that are open in other windows and exit Notepad++.
11. Go back to FileZilla and upload all the PHP files, being careful to choose the same directory from which you downloaded them originally. When the challenge box pops up, specify “Overwrite” and “Always use this action.”
Try to open your site again. It should be back to normal. If it isn’t, upload the bad files you had stored in a separate directory and try something else, because this obviously wasn’t the bug you had!
If the fix works, be sure to change your database and WordPress passwords. And let me know either way whether this did the trick!


